Table of contents
Why Internet via radio relay? Well, if you have Starlink installed in your motorhome, you have a solid internet supply.
If fiber optic Internet is not available at home or is more expensive than 50 euros/month, then it is worth using Starlink local for the above-mentioned 50 euros. The travel rate is 72 euros.
If you use Starlink only temporarily, the tariff can also be paused (look out for this option when taking out a contract, currently only available in the travel tariff!
How do you get Internet from the motorhome to the house?
Two options: via cable or radio relay.
So if you can lay a network cable, you need an external network connection on the motorhome and one on the house (or a weatherproof wall duct).
If the motorhome is within sight of the house, you can also install a radio relay link. This in turn requires an external network connection on the motorhome and a radio relay antenna on its roof, as well as the remote station mounted on the house with a wall duct for the cable that leads to the switch / WLAN router in the house.
There are directional radio antenna sets from e.g. Microtics or, the more sophisticated variant, from Ubiquitymore powerful, also in terms of range.
Mikrotik is sufficient for short distances up to 100 meters, up to 1.5 km is Ubiquity should be preferred for significant 1.5 GBit/s (requires Ubiquity-peripherals, such as Switch, Controllers …).
Ubiquity comes from the enterprise segment and offers sophisticated and powerful enterprise technology at affordable prices in the consumer sector.
Material list
- 1x IP66 CAT7 junction box
- 2x CAT7 keystone
- 2x CAT-7 cable angled
- 1x 50 mm aluminum pipe holder
- 4x M6 / M8 (depending on the flange hole) x 90 mm (depending on the thickness of the WoMo wall) V2A TX with flange
- 4x M6 / M8 V2A nuts, self-locking
- 1x 2m 50 mm aluminum tube
- 1x 50 mm pipe cap
- 2x Ubiquiti airMAX GigaBeam Plus POE 24V
- 1x POE-MikroTik GESP+POE-IN (if no POE port is available)
- 1x DCDC converter 12V in / 24V out - 10A (if no POE port is available)
The implementation
The aluminum tube is cut to the right length for mounting on the motorhome, the rest is used for mounting on the house roof. Here, the aluminum tube was covered with shrink tubing.
Mounting the pipe bracket
The holes in the pipe bracket are marked using waterproof fine liner. Once the holes have been drilled, the pipe bracket is glued to the previously cleaned wall surface with body adhesive, which also acts as a sealant, and secured with four V2A screws.
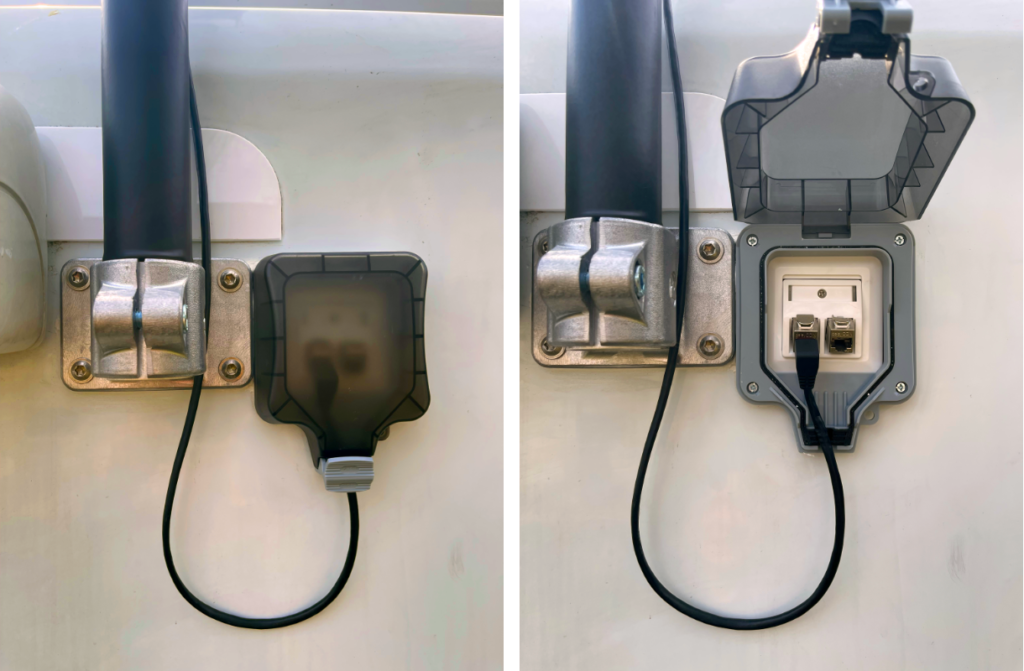
Installing the CAT junction box
The weatherproof CAT junction box requires somewhat more complex processing due to the square box cut-out.
First, the outlines are carefully drawn with FineLiner and a 2 mm hole is drilled in the four corners, followed by a final 8 mm hole. Each 2 mm corner hole is then drilled just under 5 mm inside the outline drawn.
A multitool with a fine metal saw blade has proven to be the easiest way to produce the square cut-out. Following the FineLiner markings applied all the way around, the cut-out is produced cleanly right into the drill holes.
The desired final size is then achieved by filing, always applying pressure only in the direction of the vehicle wall to prevent the aluminum skin from detaching from the wall insulation.
With GRP superstructures, work can be carried out in both directions as usual.
The cut-out must be made very precisely and never too large, in order to avoid unnecessary leaks due to an excessively large gap between the inserted (not OPEN) junction box and the vehicle wall. Here too, body adhesive is used for both bonding and sealing.
The four visible screws do not hold the box, but only the installation frame of the CAT keystone connections and the bottom part of the box!
CAT cabling
The two CAT8 cables are used to connect the antenna and the router in the motorhome via the CAT7 keystone. As CAT8 cables allow a higher transfer rate and are not significantly more expensive than CAT7 cables, CAT cabling was chosen.
Mounting the radio relay antenna
The directional antenna (here Ubiquity) is roughly aligned and fastened to the upper end of the aluminum mast with a V2A clamp and fine-tuned to the remote station using the horizontal and vertical adjustment.
The connecting cable must still be secured with cable ties, but in such a way that a horizontal 360° rotation of the directional antenna remains possible.
While driving, the antenna remains in a laterally aligned position (as shown below), corresponding to the lowest wind resistance.

Connection to the router
If the router does not provide POE ports, you cannot avoid using a POE-MikroTik GESP+POE-IN which is connected between the router and the antenna and supplied with the required 24V via a DCDC converter that converts the on-board 12V to 24V.
Ubiquiti - Controller
The management of Ubiquity-components is carried out via a browser- or hardware-based controller.
The browser variant is independent of the operating system used. Ubiquity offers, in addition to an app for Android or iOS devices, cloud controllers that allow worldwide administration. The hardware controllers can also be administered remotely.
Whereas a few years ago it was still helpful to be familiar with the subject matter, today the setup is more intuitive and can therefore also be carried out by non-experts.
In principle, every Ubiquity-component 'adopted', are made known to the controller. Hardware controllers, such as the CloudController or DreamMachine, are accessible via the standard IP 192.168.1.1 reachable.
Once the set-up routine has been completed, you will find the following in the controller interface available on the network Ubiquity-components. Before you start looking forward to 'adopt' to add the device to the network, you should first make the basic settings such as the static IP of the controller, if applicable, creation of a user other than the default, etc.
Only then should all devices 'adopted' and configured individually. This initially includes the speaking name assignment, possibly setting up static IPs, for Access Points the assignment of the desired SSIDs, channel allocation, authorizations, bandwidth limits, etc.
With Cameras the respective options must be configured, additive software installed if necessary, behavior regarding detection of movement, etc. defined and recording locations determined (e.g. Dropbox).