Table of contents
Updated - February 17, 2025
Apparently it's an ever-present theme: at some point there's a rattle, then there's a squeak and finally there's silence... - and you have a pleasantly warm floor above the ALDE heating system. But only there. Not healthy in the long term, neither for the legs nor for the ALDE heating. So heating to ZERO.
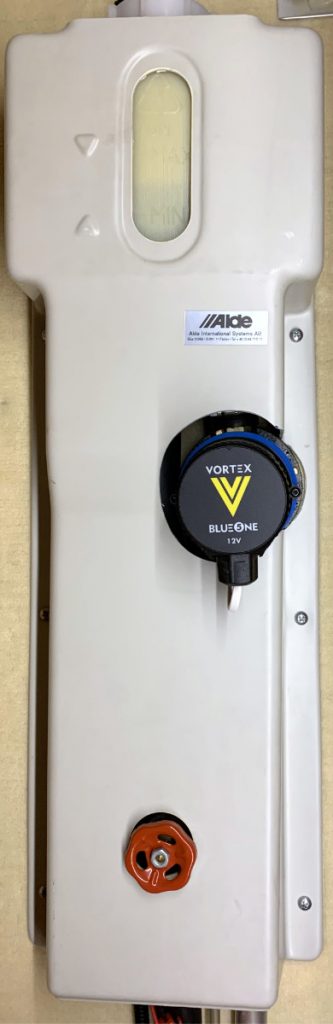
As a replacement for the “quirl”, which is (over) expensive at around 250 euros Vortex 12Volt drinking water circulation pump 1/2″ IT BWO 155 R 12V 434-121-000 proven. It costs just under 150 euros, runs almost inaudibly and is between 2,000 and 3,000 revolutions/min. Infinitely adjustable, consumes just under 3 watts in the given installation position. Two pieces are required for mechanical connection Viega Sanpress 2211 transition piece 18 x 1/2″ AG and two stainless steel hose clamps 20 – 32 mm, as well as approx. 40 cm twin strands 2×0.75mm2 required for the DC connection.
Assembly
The assembly is easy. First, the liquid is sucked out of the expansion tank in the wardrobe using a small suction pump. To do this, with a little patience and sensitivity, place the suction hose in the hose connection at the bottom right and insert it about 40 cm deep. This ensures that the rubber hose underneath the expansion tank is empty and can be removed after loosening the two hose clamps without the risk of flooding.
This rubber hose is divided into two pieces of equal length using a sharp cutter knife.
Loosen the pipe clamps holding the aluminum pipe. Using a mini pipe cutter, e.g Virax copper 28 MM, shorten the aluminum tube to the required length. This results from the overall length of the pump, plus the connecting pieces with a surcharge of 10 mm each. They form the mechanical-acoustic decoupling of the pump from the pipe system.
It is recommended for sealing the ½” screw connections Petec 97215 thread seal. Coat two threads completely with the slightly viscous agent and tighten the screw connections. The agent binds anaerobically and seals immediately. It is equally suitable for gases and liquids.
Slide the rubber hoses onto the ends of the two screw connections as far as they will go and secure them with the hose clamps. Do not overtighten to avoid damaging the rubber.
Now park the two hose clamps just below the bead of the two connecting pieces, push the upper rubber hose onto the expansion tank connector and the lower end onto the aluminum pipe. Finally, adjust the pump so that the 10 mm decoupling previously taken into account is maintained. Position the two hose clamps in the old grooves.
Finally, provide the plastic cover with a suitable recess for the pump and install it.
If you want to make it perfect, we recommend a flying 2A microfuse in the DC supply line.
Heating march - and, as you can hear, you hear almost nothing: you have to put your ear to the pump to hear a quiet whirring noise. And yet it gets cozy and warm again.
Response to a reader's comment
An attentive reader asked why the pump was installed in the right-hand pipe section instead of the left-hand one, in which the old "whisk" also did its job.
The question is absolutely justified and also correct, because - normally - a heating pump is always installed in the return flow (lower temperature of the pumped medium).
For reasons of space, this resulted in a different installation in the (hotter) flow line. Otherwise it could not have been accommodated inside the plastic cover, but would have had to be installed externally.
Admittedly, this is simply an aesthetic aspect that is more likely to make the technician roll his eyes than gain professional recognition.
However, since the industrial heating pump can be used for operating temperatures of up to 95 °C (according to data sheet), the temperatures of up to 72 °C generated by the ALDE 3030 heater do not harm it.